
Introduction
An LED chaser is one of the most popular beginner Arduino projects. In this project, multiple LEDs turn ON and OFF one after another in a sequence, creating a “running light” or “chasing” effect.
This project helps you understand:
- Digital output pins
- Basic electronics (LEDs & resistors)
- Arduino programming (pinMode, digitalWrite, delay)
It’s perfect for school projects, electronics beginners, and IoT learners.
Project Objective
To design and program an Arduino circuit where 5 LEDs glow one by one in sequence, creating a chaser effect.
Components Required
| Component | Quantity |
|---|---|
| Arduino Uno | 1 |
| LEDs (any color) | 5 |
| 220Ω Resistors | 5 |
| Breadboard | 1 |
| Jumper Wires | As needed |
| USB Cable | 1 |
Circuit Diagram
The following diagram shows how the 5 LEDs are connected to the Arduino Uno using current-limiting resistors.
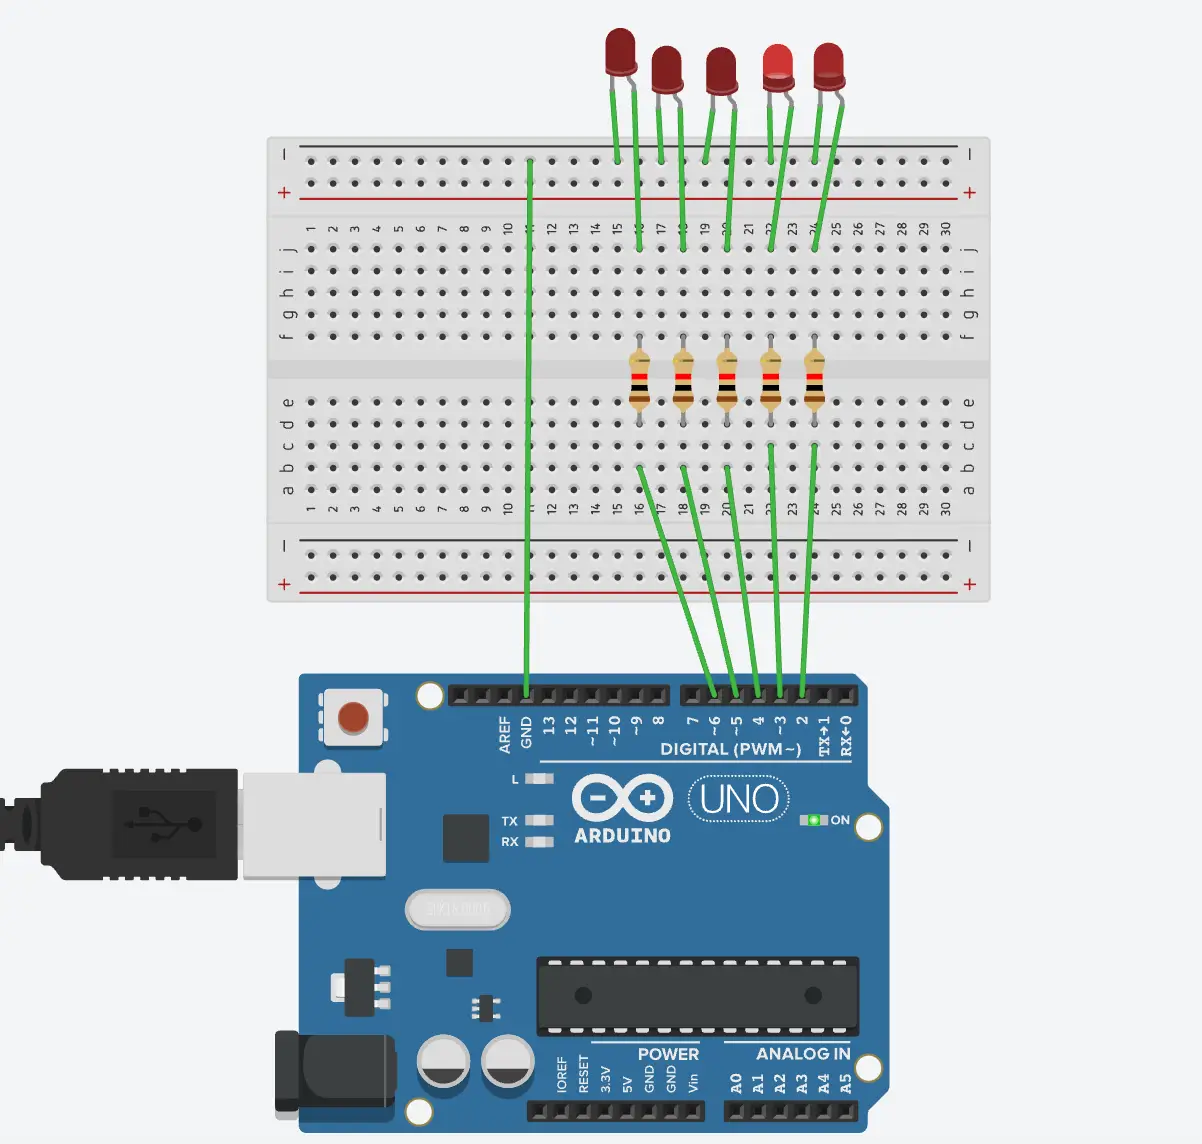
Circuit Diagram Explanation
Each LED is connected to one Arduino digital pin through a resistor.
Connections:
- LED Anode (+) → Arduino Digital Pin
- LED Cathode (–) → Resistor → GND
Pin Mapping Example:
| LED | Arduino Pin |
|---|---|
| LED 1 | D2 |
| LED 2 | D3 |
| LED 3 | D4 |
| LED 4 | D5 |
| LED 5 | D6 |
The resistor protects the LED from excessive current.
Circuit Setup Steps
- Place the Arduino and breadboard on a flat surface
- Insert 5 LEDs into the breadboard
- Connect a 220Ω resistor from each LED’s negative leg to GND
- Connect LED positive legs to Arduino pins D2–D6
- Connect Arduino GND to breadboard GND rail
Arduino Code (5-LED Chaser)
int leds[] = {2, 3, 4, 5, 6};
int totalLeds = 5;

void setup() {
  for (int i = 0; i < totalLeds; i++) {
    pinMode(leds[i], OUTPUT);
  }
}

void loop() {
  // Forward direction
  for (int i = 0; i < totalLeds; i++) {
    digitalWrite(leds[i], HIGH);
    delay(200);
    digitalWrite(leds[i], LOW);
  }

  // Reverse direction
  for (int i = totalLeds - 1; i >= 0; i--) {
    digitalWrite(leds[i], HIGH);
    delay(200);
    digitalWrite(leds[i], LOW);
  }
}
How the Code Works
- int leds[] – Stores Arduino pin numbers connected to LEDs
- setup() – Sets all LED pins as OUTPUT
- loop() – Runs LEDs forward and backward in sequence
- delay(200) – Controls the chasing speed
Customization Ideas
- Change Speed
delay(100);– Faster
delay(500);– Slower - One Direction Only – Remove the reverse loop
- Add RGB LEDs – Create color chasing effects
- Sound Reactive – Use a sound sensor for music-based lighting
Real-World Applications
- Decorative lighting
- Festival & event lighting
- Automotive indicators
- Learning base for IoT projects
- Signboards & displays
Learning Outcomes
- Arduino digital I/O
- LED polarity & resistors
- Loop-based logic
- Timing control using delay()
Source Code (GitHub)
👉 Full project source code is available on GitHub:
https://github.com/iamsss/5-LED-Chaser-Arduino
Conclusion
The 5-LED Chaser Arduino Project is a perfect starting point for anyone entering electronics or IoT. It builds confidence and prepares you for advanced projects like traffic lights, smart indicators, and IoT lighting systems.
